Search This Blog

Showing posts with label easy. Show all posts

Easy Pizza

>> Monday, November 19, 2012


I'm coming back to the blogosphere because I've missed it!  Since I've been gone, I've:
  • successfully survived a year in a 2 bedroom apartment with 2 kids
  • built and moved into a new house (not that I built it, but you get what I mean)
  • worked a little on and off in my job-before-mommy
  • gone to numerous cub scout, football, and other school events
  • and, had a baby!!! Whom I sort of adore.  Isn't she cute?
  • So needless to say, I've been a little busy and have neglected this blog.  I'd like to start posting again, as time permits.  Mostly recipes, because I love to cook and I'm always trying new recipes.  But maybe some other stuff too.

    Most of my recipes are just normal, family recipes.  I grew up with old-fashioned home cooking, and that's what I like to stick to, but I usually try to make it a little healthier.  And what kids don't love pizza, so I thought I'd share my easy method for pizza.  We have 1 pizza place in our little town now that we've moved to a pretty rural area.  It's about 7 minutes away and I'm more than a little tired of it.  We have a couple more in the next town, 15 min away. 

    I typically use frozen bread dough for my crust.  I just thaw it, roll it as thin as possible and top it.  I have learned it has to be really thawed, not still cold, or it's too rubbery and too hard to roll thin.  One day my father-in-law came on a Saturday to play with the kids.  I didn't have time to thaw dough and I was just trying to think of something to make them really quick.  I tried a quick, no rise dough recipe which I think I'll stick with.  My favorite pizza sauce is LaRosa's (although I'm not a big fan of their pizza), but other members of my family are sick of that sauce so for this I used Classico tomato and basil marinara sauce and it was really good.   You can do so  many variations on the topping - taco pizza, chicken/black beans/cilantro/onion/bbq sauce, buffalo chicken, veggie, thai, etc.  And of course kids love to do the make-your-own so sometimes we make individual ones.

    Dough:
    1 cup warm water
    1/2 teaspoon salt
    2 1/2 cups (approximately) all-purpose flour
    1 tablespoon active dry yeast
    Butter, for greasing the pan

    To make pizza crust, combine warm water and salt in a mixing bowl. Add about 1.5 cups of the flour along with the yeast and stir. Add remaining flour and knead into a smooth dough (add enough flour, beyond the 2.5 cups if necessary).  I use a stand mixer and the dough hook to mix this together and knead it.  Cover and set in a warm place (but you don't have to let it rise).  Roll it out to your desired thickness, put on your greased pan, add toppings and bake at 450 for 10-12 minutes. 



Read more...

Space-Saving Coat Storage

>> Tuesday, October 30, 2012

My husband thinks I'm crazy sometimes, but I think I'm genius!  Ok, let me explain.  See, we had our home built about 6 years ago.  We basically went with a house at the top of our budget, at least the budget we wanted, not the bank.  That was when the housing market was booming, so they approved us for much more than we actually felt comfortable with.  Good thing we had some common sense (thanks, parents!), 'cause it probably wouldn't have been good.

Anyway, back to the genius part.  Our builder wasn't a custom builder.  As in, we had a few choices but not many.  We picked our flooring, countertops, cabinet style, and siding color from a limited selection.  Most things were upgrades that we would have had to pay extra for, so for the most part we stuck with the basics.  We didn't even have a choice in paint....everything was painted flat white.  My mom and I painted almost the entire house in the 2 days before we moved in.  Fun times!

One of the great things about our house is that it is a perfect DIY house!  Everything works and there is nothing we had to do, but there are lots of things we (or at least I) want to do.  One such project was to add storage near the main entrance.  Our front entrance and garage entrance are close to each other, and there is just a small 2x2 coat closet in between.  Not enough coat storage for a family of 5!  So, I started googling (this was before I knew about Pinterest.com!) and found a couple inspiration photos that I thought would be good for our situation.

Here's the project:

Basically, when you open the door from the garage, there is a blank wall that is just not doing anything.  Here it is in the photo below.  The door you see in the background on the right is our 1/2 bath, behind me is our front door, and to the left is the coat closet.


Anyway, I decided the best solution would be to add a coat rack behind the door.  My parents have a 103 year old farm house, and it has coat storage flat along the wall, so I kind of use that as my inspiration as well.  I would have loved to add a "locker" or a bench or something, but obviously there is no room for something like that.  So, off to the hardware store I went.  I basically just purchased some 1x6 boards.  I picked the pre-primed composite ones, because I'm pretty new with woodworking and didn't feel competent to work with raw wood.  If I had to do it over again, I would choose the raw pine wood because it's a little nicer material than the composite ones I chose.  The only extra step is to sand and prime the wood before you paint it, but that doesn't take very long to do.

So, basically once I purchased my wood, I came home and cut it to the length of my wall, painted it, put construction adhesive on it and then screwed it into the wall.  I wanted 5 hooks on each board, so I measured them out equally and put the screws in so they would line up behind the hooks.  No patching... genius!

Here's how it looked with the screws, before adding the hooks.


And here is the finished product:


It's the perfect place to hang the backpacks as well as some of the jackets that we use the most.  It also turned out to be a good place to stash a couple of baseball caps.

Here's a close-up of the hooks I used.  I found them at Lowes.  But unfortunately there was a supplier issue and I had to go to 3 different Lowes to get all 10 of my hooks :(.  But I really wanted hooks with two places to hang things on.  Plus I didn't want something that was tiny or huge since the door would hit them if they stuck out too far.  These were the perfect size.


So, those 10 hooks added a lot more storage room in a previously unused wall space.  For a little extra shoe storage, I hung a closet organizer on the back of our closet door...it's the perfect size for all of those toddler and little boy shoes. Plus our adult sandals fit in there as well.


Hope this post gives you a little inspiration for a totally easy DIY project!

Read more...

No, really...I am back :)

>> Monday, October 29, 2012

So, I wrote a blog post with the reasons why I haven't posted much over the past 9 months. And then I promised that I would write more.  And it's been an entire month since that post and I haven't written anything.  Ugh.  I'm such a good blogger :)

I do have several posts to write on projects that I've been working on...but for now, I'll share a recipe that I tried for breakfast this morning.  It was really good, but totally not healthy by any stretch of the imagination.  But it's great for a special occasion.  And today's special occasion was that it's Monday and my youngest had her 15-month check-up (3 shots!) today. Which, in my book, requires something special for breakfast.


If you are looking for a quick, no rise cinnamon roll that tastes good, try this recipe:

No Yeast Cinnamon Rolls (click for the original recipe & wonderful photos!)


Preheat your oven to 425. Pour 1 tablespoon of melted butter into a 9-inch round cake pan. Brush to coat the entire perimeter of the pan.
Filling:
In a small bowl, combine:
  • 3/4 cup dark brown sugar
  • 1/4 granulated sugar
  • 2 teaspoons cinnamon
  • 1/8 teaspoon ground cloves
  • 1/8 teaspoon salt
Add 1 tablespoon of melted butter and stir until crumbly. Set aside.
Dough:
In a medium bowl, combine:
  • 2 1/2 cups all-purpose flour
  • 2 tablespoons sugar
  • 1 1/4 teaspoons baking powder
  • 1 1/4 teaspoons baking soda
  • 1/2 teaspoon salt


In a separate bowl, combine:
  • 1 1/4 cups buttermilk
  • 2 tablespoons butter, melted
Add the buttermilk mixture to the flour mixture and stir until the liquid is just incorporated, about 30 seconds. Transfer the dough to a lightly floured work surface and knead until just smooth, 3 to 4 minutes. Roll the dough into a 9x12-inch rectangle. Brush the surface of the dough with 1 tablespoon of melted butter.
Sprinkle the filling evenly over the dough. Gently press the filling into the dough. Starting at a long edge, roll the dough to form a log.
Cut the log into eight equal pieces. Place one roll in the center of the prepared pan, and the seven remaining rolls around it in a circle. 
Brush with 2 tablespoons of melted butter. 
Bake in the preheated oven for 25 to 28 minutes, or until golden brown. Allow rolls to cool for 5 minutes.
Glaze:
In a small bowl, combine:
  • 3 oz. cream cheese, softened
  • 2 tablespoons buttermilk, at room temperature
  • 4 tablespoons confectioners' sugar
Whisk first 2 ingredients until smooth. Add 4 tablespoons of confectioners' sugar 1 tablespoon at a time. Whisk until a smooth glaze forms, about 30 seconds.


Enjoy!

Read more...

Yogurt and Fruit Parfaits

>> Thursday, April 12, 2012

I'm back for my first post in, err, a while.  I'm suprised Beth hasn't fired me yet!!!  We are moving into our new house in a little less than a month, so I hope to post more regularly then.  The past 10 months of living in a 2 bedroom apartment haven't been too terrible, but I haven't had much motivation to cook or craft in our small space.  The lighting is also terrible, so I haven't been able to take good pictures of any recipes I have made.  Over the next 3 months, I plan to do lots of DIY decorating of our new home, including a nursery for our baby girl due in July!!, and lots of cooking in my new kitchen and stocking my freezer in preparation for baby.  I hope to post about a lot of those things. 

I have also been terrible about responding to comments on our posts, but I appreciate them all.  I got several supportive comments on my motherhood vs. career post, and it's great to know other ladies can relate.  Just today there is a news story about a commentator attacking Mrs. Mitt Romney for "not working a day in her life".  I don't know much about the Romneys, but apparently she's raised 5 sons.  Sounds easy to me! (insert heavy sarcasm) Anyway, my point is that in a nasty world of women attacking each other and putting each other down, I am grateful for those who took the time to comment in such a positive way!

I am always looking for quick, healthy snacks my kids can grab from the refrigerator.  I am pretty much the pantry police, because my oldest son always heads there when he is hungry and I am always trying to direct him towards either a healthy pantry choice, or preferably something from the refrigerator.  I really don't have alot of candy, sweet things, or junk in my pantry -- I am much more likely to bake a cake than buy snack cakes or cookies or chips -- but still most items in my pantry that don't require preparation are inferior to choices in the fridge.  For some reason, my son doesn't choose unsweetened applesauce from the pantry!  Anyway, I love to make these and the kids love them too.  I have long been a fan of McDonald's yogurt parfaits, so that's kind of the idea behind these.  See what I mean about terrible lighting?


Choose your favorite yogurt.  I tend to use Dannon Light and Fit Vanilla Yogurt for the kids.  For myself, I try to use Greek yogurt for the extra protein (kids won't eat this kind).  I am addicted to the little Chobani Champions in Berry flavor.  I tried them in the store, and although they are meant for kids, I keep buying them and hiding them in the back of the fridge hoping no one else notices them.  Layer your yogurt with the fruit topping.  I like putting them in these glass jars and it makes them more attractive to the kids for some reason.  Before eating them, add granola if you want.  You could also layer it within the parfait, but I like mine crunchy and the kids don't like it at all.

Fruit Topping:  (blueberries, peaches, strawberries, raspberries)
2 cups fruit (I use frozen right now, may use fresh this summer as it is in season)
sugar -- amount depends on your taste.  The recipe I adapted called for 1/4 cup, but I use half of a 1/8 measuring cup.  Sometimes I use a couple of tablespoons and then 1 tablespoon of splenda.  Adjust this to your taste and to your preferred sweetener.
Place these in a saucepan over medium heat and stir until the frozen fruit starts to break down a little.  In a little bowl, mix together 1 tablespoon cold water, 1 and 1/2 teaspoons cornstarch, and 2 teaspoons lemon juice together.  When it is smooth, pour it in the saucepan.  Add a sprinkle of cinnamon to your taste, and a little vanilla.  Bring mixture to a boil and then quickly reduce to a simmer.  Stir a minute or two until thickened.  Remove from heat and let cool.

For cherry, I reduce the sugar a little more and use a tablespoon of brown sugar.  I also add about 1/2 teaspoon of almond extract to the mixture and omit the cinnamon.  I love the addition of the almond flavor to the cherries.

The parfait above has cherries and blueberries.  The strawberries make for a much prettier presentation, but this is probably my favorite flavor combo.  Don't skip the cinnamon. Just a little gives the fruit such a great flavor.  I keep these for 3 days or so in the fridge.  After that the fruit starts to get watery.  This fruit topping would also be good over pancakes, french toast, or frozen yogurt.


Read more...

Butternut Squash Ravioli with Brown Sugar Butter Sauce

>> Saturday, November 19, 2011

I'm sure by now Beth has given up on me!  Things are so crazy for us right now.  We have so many thing going on and 2012 is going to be a huge year for us. 

I have a super quick and easy recipe to share for now.   My husband and kids wouldn't touch this with a 10 foot pole -- entirely too weird for them.  But I think it's really, really good.

I bought the butternut squash ravioli at Costco.  While the ravioli is boiling (according to package directions), make the sauce:
1/4 cup butter
1/2 cup brown sugar
1/4 cup parmesan cheese, grated is best but I had shredded
1/8 tsp cajun seasoning
1/8 tsp sage
1/8 tsp nutmeg

Melt the butter and brown sugar together over low to medium heat.  Cook for a minute or so until it gets a little thickened.  As you can see in the photo, my heat was entirely too high and my sauce "seized up" so go low on the heat here.  Take the sauce off the heat and stir in the spices and cheese.  You many want to start with a little less of the spices and adjust according to your taste.  Stir the drained ravioli into the sauce and this will thin the sauce a little.

I made half this amount of sauce and about 8 ravioli pieces and thought it was more than enough sauce.  So you'll have to play with the amounts depending on how much sauce you want.  I tried to go light on the sauce.  You could also add some bacon or toasted walnuts to this.

Read more...

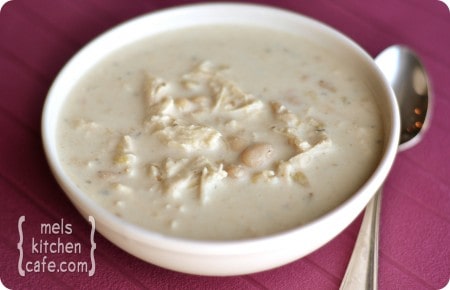
Soup Recipes - White Chicken Chili and Loaded Potato Soup

>> Sunday, November 13, 2011

Sheesh..it's been a busy couple of weeks!  Sorry about the lack of posting around here.  You know I've been really busy because I haven't been on pinterest.com or on my google reader for about 2 weeks!

The weather has been really crazy...one day there's frost on the ground and the next day is nearly 70 degrees out.  But this time of year, I really love to have a nice warm bowl of soup.  My two favorite soups?  White Chicken Chili and Loaded Potato Soup.   Both are are a creamy soup, so they aren't super-healthy, but they are quick and easy and tasty.  Despite what a lot of my friends think, I don't like to spend all my time in the kitchen.  I love a good meal, but I don't want to spend all day making it.  After all, I do have 3 kids who need my attention, a dog and a house to clean as well.  Who has time to slave away in the kitchen all day on one meal?!


Creamy White Chili
*Serves 6
1 pound boneless, skinless chicken breasts, cut into 1/2-inch cubes
1 medium onion, chopped
1 1/2 teaspoons garlic powder or 2 cloves fresh garlic, finely minced
1 tablespoon oil
2 cans (15 1/2 ounces each) Great Northern Beans, rinsed and drained
1 can (14 1/2 ounces) chicken broth
2 cans (4 ounces each) chopped green chilies (if you like less kick, add just one can)
1 teaspoon salt
1 teaspoon ground cumin
1 teaspoon dried oregano
1/2 teaspoon pepper
1/4 teaspoon cayenne pepper
1 cup sour cream
1/2 cup whipping cream
Fresh cilantro, for garnish (optional)

In a large saucepan, saute chicken, onion and garlic powder (or fresh garlic, if using) in oil until chicken is no longer pink. Add beans, broth, chilies and seasonings. Bring to a boil. Reduce heat; simmer, uncovered, for 30 minutes. Remove from the heat; stir in sour cream and cream. Garnish with fresh cilantro, if desired. Serve immediately. This is especially good served with tortilla chips.

Slow Cooker Option: In a medium round slow cooker, place 1 pound chicken breasts (fresh or frozen) without cubing them. Add the chopped onion, garlic powder, beans, green chiles and all of the spices. Do not add the sour cream or whipping cream yet! Reduce the chicken broth to 12 ounces (about 1 1/2 cups) and pour in over the other ingredients. Stir the mixture around a bit to incorporate the dry spices. Cook on low for 5-7 hours (if using frozen chicken you'll cook on the longer end of that spectrum, fresh chicken will cook in less time). Remove the chicken to a cutting board and shred in bite-size pieces. Stir back into the slow cooker. In a small bowl or liquid measuring cup, whisk together the sour cream and whipping cream  until smooth. Whisk the cream mixture into the crockpot with the other ingredients. Let the soup cook until heated through. Serve.

*Note:  I combined the two methods and sauteed the chicken, onion and garlic in the oil and then transferred it to the crock pot and added the remainder of the ingredients and cooked it over low for 4-6 hours.  About 30 minutes before serving, I added the sour cream and whipping cream.

source

O’Charley’s Baked Potato Soup
source: copykat.com
Yield: approximately 12 large servings.
3 lbs. red potatoes
1/4 C. margarine, melted
1/4 C. flour
8 C. half-and-half
1 (16-ounce) block Velveeta cheese, melted
White pepper, to taste
Garlic powder, to taste
1 tsp. hot pepper sauce
1/2 lb. bacon, fried crisply
1 C. cheddar cheese, shredded
1/2 C. fresh chives, chopped
1/2 C. fresh parsley, chopped

Dice unpeeled red potatoes into 1/2-inch cubes. Place in a large Dutch oven, cover with water and bring to a boil. Let boil for 10 minutes or until 3/4 cooked.

In a separate large Dutch oven, combine melted margarine and flour, mixing until smooth. Place over low heat and gradually add half-and-half, stirring constantly. Continue to stir until smooth and liquid begins to thicken.
Add melted Velveeta. Stir well. Drain potatoes and add to cream mixture. Stir in pepper, garlic powder and hot pepper sauce.

Cover and cook over low heat for 30 minutes, stirring occasionally.

Place soup into individual serving bowls and top with crumbled bacon, shredded cheese, chives and parsley.


Read more...

10 Weeks of Christmas -- Week Two...Neighbor Gifts - the Non-Food edition :)

>> Sunday, October 30, 2011

Lesley and I both posted some great food ideas for neighbor (or friend gifts) here and here earlier this week. But most of the ideas were food gifts. If you are looking for some ideas that don't involve food, here are some ideas for you.  I tend to gravitate more towards the "winter" ideas because if you give the gift sometime the week before Christmas, they will be able to keep it out longer if it is snowmen or winter rather than Christmas.

Idea #1 - Snowman Doorstop - These are adorable! My mom made these one Christmas about 5 years ago and I still love putting it out each year! I put mine in our front porch each year. She used some clay (that you bake to harden) in orange for the carrot nose and in black for the eyes and buttons. I really like the idea of using real buttons, though. 


Idea #2 - A Snowman Kit - Another cute idea. The carrot is purchased, but the hat and the scarf are homemade, so it makes it budget friendly!


Idea #3 - Sock Snowmen - How cute are these snowmen?! And they are made from a tube sock and a decorative sock found at Target for $1! These are cute and easy!


Idea #4 - Hand Soap - Something everyone uses, and it's fun to have some festive soap for the season! I like the cute saying she came up with for it, and she includes the file to download so all you have to do is print, cut it out and attach it to the soap!


Idea #5 - Christmas Printable - I just love all the printable files floating around on the internet and I think it would make a great gift! I recommend sending the file online to a photo printing place (like Walgreens, CVS or similar) so you have a good quality 8x10 print. Find some inexpensive frames to put them in. A little more on the pricey side if you have a lot of gifts to give, but it's really easy and doesn't require any "Martha Stewart-type skills" :) There are tons of free options online (search for subway art), but here are two that I really liked. 

source

The best part about making a non-edible gift is that you can do it now and not have to scramble at the last minute trying to get everything done in the craziness of the holiday rush.  Hope these ideas help give you some inspiration for the holidays!

Read more...

Low Calorie Pumpkin Pie

>> Sunday, October 16, 2011

Here's my little gift for posting super unhealthy recipes lately!

I have made this a few times and I really like it.  The low-cal version is never going to taste the same as the full fat version, so keep that in mind!  Here's the link for the recipe.  It is from Hungry Girl, who has several cookbooks and a cooking show.

<>

(this is a picture of a random pumpkin pie with traditional crust)

Ingredients:
For Crust2 cups Fiber One bran cereal (original)
1/4 cup light whipped butter or light buttery spread (like Brummel & Brown); melted & mixed with 1 oz. water
3 tbsp. Splenda No Calorie Sweetener, granulated
1 tsp. cinnamon

For Filling
One 15-oz. can pure pumpkin (NOT pumpkin pie filling)
One 12-oz. can evaporated fat-free milk
3/4 cup Splenda No Calorie Sweetener, granulated
1/2 cup fat-free liquid egg substitute (like Egg Beaters)
1/4 cup sugar-free maple syrup
1 tbsp. pumpkin pie spice
1/2 tsp. cinnamon
1/8 tsp. salt
Optional Topping: Fat Free Reddi-wip

Directions: Preheat oven to 350 degrees. In a blender or food processor, grind Fiber One to a breadcrumb-like consistency. Combine crumbs with all other crust ingredients. Stir until mixed well. In an oven-safe 9-inch pie dish sprayed lightly with nonstick spray, evenly distribute mixture, using your hands or a flat utensil to firmly press and form the crust. Press it into the edges and up along the sides of the dish. Set aside. In a large bowl, combine all ingredients for the filling. Mix well. Pour mixture into pie crust. (Filling may be taller than the crust -- trust us, this is okay!) Bake pie in the oven for 45 minutes, and then remove it and allow to cool. Chill in the fridge for several hours (for best results, chill overnight). Cut into 8 slices, and if you like, top with Reddi-wip before serving! MAKES 8 SERVINGS

Serving Size: 1 slice
Calories: 133
Fat: 3g
Sodium: 236mg
Carbs: 28g
Fiber: 9g
Sugars: 8g
Protein: 6g

POINTS® value 2*

Read more...

Cleaning Your Microwave...the lazy way :)

>> Saturday, October 15, 2011

Ok, so I'm a little embarrassed about this post.  Because this is gross.  And not something I can blame on the kids.  Although, my husband is a big part of this as well, so it's really not just me.  Really.

Here is a picture of our microwave.  Yep, that's splattered food that we didn't clean off right away.  This is how everyone's microwave looks, right?!


Ew.  Anyway, I have found an easier way to clean the microwave.  I've been doing it for years, but just recently learned that not everyone knows this trick, so I thought I would share.  Anyway, the best way to clean your microwave is to clean up the splatter right away so the food doesn't have time to dry out on the sides of your microwave.  Making it impossible to clean and tedious scrubbing.  But that doesn't happen often enough around here since I am usually rushing to get everything on the table at the same time.  So here's my trick....put a glass of water in the dirty microwave like pictured below.


Ok, so it's more work than just putting a glass in the microwave.  Obviously it doesn't clean itself.  But, you put a glass (I always use glass because of the BPA crap in plastics) of water in and turn it on high for a couple minutes.  I always do 2-3 minutes and then let it sit in there for a few more minutes.  Be careful removing the glass because it gets hot and can burn your hands!  The steam from the water you just microwaved will turn the dried out food into "hydrated food" that will just wipe right off.  No scrubbing necessary.  I remove the glass turn table from the bottom and wash that in the sink with soap, but everything else just gets a quick wipe down.  The "after" photo is below.


Like I said, no scrubbing involved.  It's easy peasy.  Now only if I could do it more often so the microwave doesn't get as gross as the first photo!

Read more...

Golden Grahams S'mores Treat

>> Friday, October 14, 2011

I had half a bag of golden grahams recently that I wanted to get rid of, and I found this recipe on realmomkitchen.com..  Link for the recipe is here  It was very good.  I did half the recipe.


Golden Graham S'mores Treat:
9 cups golden grahams
3/4 cup light corn syrup
3 tablespoons butter
11 1/2 oz package semisweet chocolate chips
1 tsp vanilla
3 cups mini marshmallows (I used big ones cut up into pieces because that's what I had, but I'm sure minis would be much less messy!)

Line a cookie sheet with parchment paper or grease with butter.  Measure golden grahams into a large bowl.  Melt butter, chocolate chips and syrup in the microwave by cooking at 30 second intervals and stirring every 30 seconds until smooth.  Stir in vanilla.  Pour over cereal and mix.  Stir in marshmallows and spread on pan, pressing down lightly with moistened hands.

Best eaten the day it is made, so when I make this again I will half the above recipe again.

Read more...

Crock Pot French Dip Sandwiches

>> Thursday, October 13, 2011

I made these recently and thought they were really good.  I adapted a recipe from allrecipes.com


French Dip Sandwiches:

Place a chuck roast in your crock pot and top with 1 can of Campbell's French Onion soup, 1 can of beef consomme, and half a can/bottle of beer (any kind works).  Sprinkle with some garlic salt and pepper (maybe 1/2 teaspoon each) and a tablespoon of worchestershire sauce.  Cook on low until fall apart tender.  Time will vary with your crockpot.  Mine took about 4 hours.  If it is still tough, keep cooking it!! The only mistake you can make is not cooking long enough.  When it is fall apart tender, shred the meat and discard any fat.  Take some of the juice from the crockpot and mix it with the meat until it is really moist.  Serve on buns with cheese of your choice (we like sharp cheddar) and we added banana peppers.  You could also add mushrooms while cooking or after, and you could thicken the sauce and serve with noodles instead of as a sandwich.

Read more...

Chocolate Chip Cookie Recipe

>> Saturday, October 8, 2011

Source

I am totally a cookie person.  I mean, what's not to like about cookies?  Other than the fact that they directly deposit on the least preferred areas of my body...

Anyway, I almost never purchase cookies from the store.  The only kind that I like to by are the Pecan Sandies and now that they have a dark chocolate version, it's absolutely my favorite purchased cookie ever.

Back to the home-made cookies.  I get a lot of magazines and most of them have to do with food in some way whether all about food or just a large focus on food.  I've been seeing the McCormick ad for their Vanilla Chocolate Chip cookies, and so I decided to try the recipe.  Here's a photo of their ad that's been in almost every magazine that I've gotten in the mail the last 2 months. You might have seen this ad too, so I thought I would make them and post about it.


As you can tell from the photo, this is also the copy I used while baking.  Geesh...I'm such a messy cook :)  Anyway, I followed the recipe exactly except I used my Mexican Vanilla.  I would never recommend using the cheap imitation vanilla from the store.  Once you've had the real stuff, you can never go back...it just smells and tastes so artificial.  Probably because it is. Ew.

Oh, the other thing I do is use parchment paper and a Pampered Chef baking stone instead of metal cookie sheets.  These were easy and good, but not my favorite chocolate chip cookie.  I would probably rate them 7 out of 10.


As you 
Vanilla Rich Chocolate Chip Cookies
Makes 5 dozen or 30 (2 cookie) servings.
Prep Time: 15 minutes
Cook Time: 8 to 10 minutes per batch
3 1/4 cups flour
1 teaspoon baking soda
3/4 teaspoon salt
1 1/3 cups butter, softened
1 1/4 cups granulated sugar
1 cup firmly packed light brown sugar
2 eggs
1 package (12 ounces) semi-sweet chocolate chips
1 cup chopped walnuts
1. Preheat oven to 375°F. Mix flour, baking soda and salt in medium bowl. Set aside. Beat butter and sugars in large bowl with electric mixer on medium speed until light and fluffy. Add eggs and vanilla; mix well. Gradually beat in flour mixture on low speed until well mixed. Stir in chocolate chips and walnuts.

2. Drop by rounded tablespoons about 2 inches apart onto ungreased baking sheets.

3. Bake 8 to 10 minutes or until lightly browned. Cool on baking sheets 1 minute. Remove to wire racks; cool completely.


Read more...