Search This Blog

Showing posts with label Ideas. Show all posts

Ch-Ch-Changes!

>> Thursday, January 26, 2012

Have I told you how much I LOVE craigslist?  If you've never visited the site, you're missing out!  It's a virtual garage sale where you can buy and sell junk stuff.  It's part of the reason we were able to become debt-free last year.


So, I got it in my head that we needed a new table for our kitchen.  It's kind of an eat-in kitchen and it's not a huge place, but our dining room has CARPET, so the daily place for us to eat our meals is at the kitchen table. We do have some bar stools at our counter now that I have made the top bigger and there is an overhang.  The boys love to eat breakfast there, but they also like to stand on the stools and that resulted in a trip to the ER a few weeks ago (mild concussion and he is fine, but it scared him and momma!).

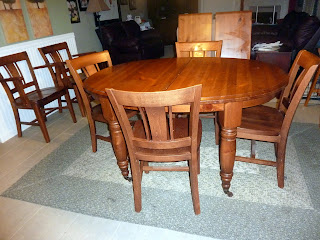
Anyway, our table was oval.  I got that on purpose because I thought the boys would have less corners to run into and less trips to the ER or bruises on their foreheads.  Which is probably true.  Except there were a few problems.  (Please excuse the low-quality photo taken late at night and taken for craigslist so it shows the leaves and the extra chairs in the background)


See how the legs of the table aren't very wide apart.  So, unless you add a leaf or straddle the legs, you could only fit 4 people at the table.  There were two leaves, but when I added those, the table was really long and made it really difficult to get around.  I have taken the photo standing in the kitchen, and the living room is in the background, so it's essential to be able to walk around the table.  The other problem?  See the bottom of the legs?  Those are WHEELS.  Which makes it really easy to add the leaves in, but also makes it really easy for two boys to sit at the dinner table and try to crush the other person with the table.  There's also a nice beveled edge.  Which is a dried food magnet.  Oh, and the crack for the leaves?  Yeah, right where the boys sit.  Which means pulling apart the table after every meal to clean out the crack.  Otherwise it's YUCK CITY!  

Which lead me to looking on Craigslist for an alternative set.  You see, I do have 4 year old and 2 year old BOYS, so I wasn't looking to spend a lot of money because it's pretty much going to get trashed over the next 5-10 years.  I stumbled across a nice set with a BUTTERFLY leaf (yeah, no more "where do I store this stupid leaf?) and it extends to a square to make 2 people sit on each side.  Which also means the crack is where Steve and I sit and not the boys.  Also, the legs are in the corner of the table so we can fit 6 chairs at the table without any problems.  Here's to hoping the boys don't have any problems with the corners!


And the best part?  The table I had before was Pottery Barn (that I had purchased off craigslist about a year ago!) and I was able to sell it for more than the one I purchased.  Oh, and while I was at it, I got a nice rug.  Off Craigslist, of course :)

Read more...

New Year's Resolutions and Goals

>> Wednesday, December 14, 2011

source

I've always enjoyed making resolutions for the new year.  Although, my resolutions aren't just things I want to do (or don't want to do).  I try to make my resolutions be real goals.  I'm a big fan of Dave Ramsey, and he helps people set goals on his radio talk show all the time.  According to Dave, "For a goal to work, it has to have five components.  It must:

  1. Be specific
  2. Be measurable
  3. Have a time limit
  4. Be yours
  5. Be in writing
I'm not sure if Dave actually came up with this list...I would guess not.  You can hear him talk about goals by going here.  It seems simple, but most people who set new years goals just say something like, "I want to lose weight".  It's a great thought, but it's not actually a goal.  I guess if you lost one pound during the following year you would have achieved your "goal" but it's not a very good goal because it doesn't have the five components.  

In addition to the five components, I also like to make goals for different areas of my life.  I like to make spiritual goals, health/body goals, financial goals, family goals and business goals.  You could also have reading goals, education goals, marriage goals, etc.  I like making categories because it makes my life seem a little more balanced.

source

So why am I writing about New Year's goals mid-December?  Because now is the time to start thinking about them.  What do you want to accomplish next year?  I'm a planner, so I like to start coming up with my goals and a plan to meet these goals before the year begins.  While some people can come up with their resolutions in a few seconds before the clock strikes midnight, I think those are typically the people who don't achieve their goals.  So start thinking now about what you want to accomplish in 2012.  Make sure they meet the 5 components, and then set a plan to achieve those goals!


Need some help keeping your goals?  Here are some links to pretty ways to keep your goals where you can see them!

source
source
source
source
source


Read more...

Homemade Christmas Gift Ideas

>> Sunday, December 11, 2011

Still looking for some inexpensive homemade gift ideas?  Check out this blog post I found with 25 ideas that cost less than $5 each!

source

Read more...

Stainless Steel Countertops

>> Friday, October 7, 2011

As most of you know, I am a stay-at-home mom.  But I also make cakes (wedding, birthday, etc) from my home.  This helps me keep my sanity and earn a little extra spending money to fund my HGTV and DIY Network addiction. :)

Anyway, one thing I have really been wanting for our kitchen is a larger center island.  Our kitchen is great and we have lots of counter tops, but our center island counter top is fitted to the cabinets and doesn't allow for bar stools.  Something that I've wanted since the first party we had at our house. 

Here is a photo of the unfinished kitchen right before we moved in 6 years ago.  Please forgive the quality of the photos...our digital camera was much lower quality back then!


Here is a photo of the kitchen after we painted and move the appliances in, but we were still moving all of our junk in, so therefore all the junk laying around.


Our home was built by Beazer Homes.  They are not a custom builder, so we didn't get many options on finishes, but we did get to pick our counter tops from about 10 different laminate styles.  This is a close-up of ours.


It's great because it doesn't show stains.  My parents have white counter tops courtesy of the previous owners of their house and I don't know how they have lived with them for so long!  While I like the color of our counter tops, laminate really isn't the "in" thing anymore.  Obviously.

So, besides wanting some bar stools, I've been wanting a surface that is better for working with my cakes. I do cakes with fondant icing a lot, but I always have to spread out some vinyl mats to work with it on because fondant sticks to laminate.  And the last thing you want once you've rolled out a huge sheet of fondant is for it to stick to the counter and leave a hole right in the middle because a patch almost always shows, so I would have to re-do it a lot.

In my research of finding out the best surfaces for fondant use, I found that solid surface counter tops and stainless steel are both NSF certified (food safety standards).  I am a home-based "cottage bakery", so I don't have to meet the NSF standards, but I like to do everything as sanitary as possible.

I really liked the look of stainless steel to add a little modern look to our kitchen.  So I did some further research and found some companies online to get quotes from and also went to Home Depot and Lowes for some quotes as well.  Um, can you say EXPENSIVE?!  I needed a 3'x6' piece for our island, and most companies were coming in around $2500.  I think the lowest quote I received was $1700.  Which was even more expensive than the high-end granite at the big box stores.  Yikes!

So, I did some more research.  AKA, I called my dad.  My dad is an airplane mechanic and I know he works with metal and welding and such, so I thought he might have some ideas.  Unfortunately, he said he didn't have the tools or access to the tools needed to work with stainless steel.  But he recommended calling a local metal shop to see if they could custom fabricate anything for me.  SCORE!  I called a local company and they quoted me $310.  WHAT!?  You've got to be kidding!  They used fancy terms like "sheared edges" and "20 gauge" in the conversation, so I called up my dad just to see if that is what I needed and he agreed, so I ordered it!

The company did end up taking a little longer to make it than they originally promised, but I really wasn't in any hurry and it wasn't that big of a deal.  I actually probably got it sooner than if I would have ordered it from any of the other companies.  I actually ordered it on 9/13 and got the call that it was ready for pickup on 10/5.  So, three weeks.  The most nervous part of the process was just waiting to see it.  Since it was custom, it wasn't like I could go and pick it out.

Anyway, here's a long-awaited photo of the new island counter top!


See how it shines?  I love it!  It's got a brushed finish so it should mask any scratches pretty well.  I was really nervous about how sharp the corners and the bottom edge would be, but I really don't think it will be a problem.  At some point, one of the kids is bound to run into one of the corners and get hurt, but they would do that with any surface.  They are soldered, so they aren't sharp but they definitely stick out farther than the old counter top.


So, here's a photo of the entire kitchen.  As you can tell from the first photos, not a lot has changed since we moved in.  We still have the same colored walls (I love the color!).  Just about the only difference is the light fixtures.  We changed out the mushroom light over the sink and added a couple matching pendant lights over the island.  I still need to find 3 bar stools and am even thinking about changing the back/sides of the island to a bead board and add some trim molding around the base to give it a more "built-in" feel.  Oh, and eventually we will change out the rest of the laminate to a solid surface.  And I would live to have a marble tile back splash (subway style) and add crown molding to the tops of the cabinets as well. See, I told you I watch way too much HGTV and DIY network!


Read more...

Recipes to take to someone

>> Monday, October 3, 2011

As most of you know, I had a baby a couple months ago. She was baby #3, which meant that my schedule suddenly got even more hectic. Fortunately, I belong to a WONDERFUL group of moms and they came to the rescue! They brought me meals every Monday, Wednesday and Friday for THREE ENTIRE WEEKS! Did I mention that I LOVE my MOMS club?

Because this was baby #3, I think most people thought I had everything under control and would be fine, because nobody else brought me meals this time around except my wonderful next door neighbor. But this was probably the hardest post-pregnancy time I've had. Because not only are my boys constantly on the move, but it's taken a lot longer this time around for my body to recover from c-section #3. Have I mentioned how much my MOMS Club rocks?!

Anyway, I wanted to share the recipes of what people brought me. Because all the meals were good, none of them were repeats, and some of them were different than your usual casserole (not that those are bad!) and I know that the hardest part for me in taking a meal to someone is actually deciding on what to take.

Enjoy this list, and I hope it inspires you next time you would like to take a meal to someone.

Recipe #1
Creamy Baked Ziti


what you need
4 cups ziti pasta, uncooked
1 jar (26 oz.) marinara sauce
1 can (14-1/2 oz.) diced tomatoes, undrained
6 oz. (3/4 of 8-oz. pkg.) PHILADELPHIA Cream Cheese, cubed
3/4 cup BREAKSTONE'S or KNUDSEN Sour Cream
1 pkg. (8 oz.) KRAFT Shredded Mozzarella Cheese with a TOUCH OF PHILADELPHIA
1/3 cup KRAFT Grated Parmesan Cheese

make it
HEAT oven to 375ºF.

COOK pasta in large saucepan as directed on package, omitting salt. Remove from pan; drain. Meanwhile, add marinara sauce, tomatoes and cream cheese to same pan; cook on medium heat 5 min. or until cream cheese is melted and mixture is well blended, stirring frequently. Return pasta to pan; mix well.

LAYER half the pasta mixture in 13x9-inch baking dish; cover with layers of sour cream, 1 cup mozzarella and remaining pasta mixture. Top with remaining mozzarella and Parmesan.

BAKE 20 min. or until heated through.


Recipe #2
Southwest Chicken Salad


what you need 
1 bag salad mix
Various favorite veggies (peeled and chopped cucumber, carrots, cherry tomatoes)
1 can or 1 and 1/2 cups frozen corn, drained or thawed
1 can black beans, drained
Tyson or Kroger brand fried chicken fritter style, baked according to directions then cut into small pieces
sharp cheddar cheese- use as much as you like
Santa Fe style tortilla strips (usually found near the salad section at the store)- as a topper

make it 
layer all ingredients in listed order. This is good with southwest ranch dressing or regular ranch mixed with salsa (1:1 ratio)!


Recipe #3
Simply Lasagna


what you need
1 lb. ground beef
2-1/2 cups KRAFT Shredded Low-Moisture Part-Skim Mozzarella Cheese, divided
1 container (15 oz.) POLLY-O Natural Part Skim Ricotta Cheese
1/2 cup KRAFT Grated Parmesan Cheese, divided
1/4 cup chopped fresh parsley
1 egg, beaten
1 jar (24 oz.) spaghetti sauce
1 cup water
12 lasagna noodles, uncooked

make it
HEAT oven to 350°F.

BROWN meat in large skillet on medium-high heat. Meanwhile, mix 1-1/4 cups mozzarella, ricotta cheese, 1/4 cup Parmesan, parsley and egg until well blended; set aside.

DRAIN meat; return to skillet. Stir in spaghetti sauce. Add 1 cup water to empty sauce jar; cover with lid and shake well. Add to meat mixture; stir until well blended. Spread 1 cup meat sauce onto bottom of 13x9-inch baking dish; top with layers of 3 lasagna noodles, 1/3 of the ricotta cheese mixture and 1 cup meat sauce. Repeat layers twice. Top with remaining noodles, meat sauce and cheeses. Cover with foil sprayed with cooking spray.

BAKE 1 hour or until heated through, removing foil after 45 min. Let stand 15 min. before cutting to serve.


Recipe #4
Barbecue Pork and Penne Skillet Recipe


what you need 
1 package (16 ounces) penne pasta
1 cup chopped sweet red pepper
3/4 cup chopped onion
1 tablespoon butter
1 tablespoon olive oil
3 garlic cloves, minced
1 carton (18 ounces) refrigerated fully cooked barbecued shredded pork
1 can (14-1/2 ounces) diced tomatoes with mild green chilies, undrained
1/2 cup beef broth
1 teaspoon ground cumin
1 teaspoon pepper
1/4 teaspoon salt
1-1/4 cups shredded cheddar cheese
1/4 cup chopped green onions

make it 
Cook pasta according to package directions. Meanwhile, in a large skillet, saute red pepper and onion in butter and oil until tender.

Add garlic; saute 1 minute longer. Stir in the pork, tomatoes, broth, cumin, pepper and salt; heat through.

Drain pasta. Add pasta and cheese to pork mixture. Sprinkle with green onions.


Recipe #5
Fannie Farmer's Classic Baked Macaroni & Cheese


what you need
1 (8 ounce) packages macaroni
4 tablespoons butter
4 tablespoons flour
1 cup milk
1 cup cream
1/2 teaspoon salt
fresh ground black pepper, to taste
2 cups cheddar cheese, shredded good quality
1/2 cup breadcrumbs, buttered

make it
1. Preheat oven to 400°F.
2. Cook and drain macaroni according to package directions; set aside.
3. In a large saucepan melt butter.
4. Add flour mixed with salt and pepper, using a whisk to stir until well blended.
5. Pour milk and cream in gradually; stirring constantly.
6. Bring to boiling point and boil 2 minutes (stirring constantly).
7. Reduce heat and cook (stirring constantly) 10 minutes.
8. Add shredded cheddar little by little and simmer an additional 5 minutes, or until cheese melts.
9. Turn off flame.
10. Add macaroni to the saucepan and toss to coat with the cheese sauce.
11. Transfer macaroni to a buttered baking dish.
12. Sprinkle with breadcrumbs. Bake 20 minutes until the top is golden brown.

(You can also freeze this recipe in zip-lock bags for later use - once you have mixed the macaroni along with the cheese sauce allow to cool to room temperature before adding to your freezer - I generally pull it out the night before and allow macaroni and cheese to reach room temperature; I then add the macaroni and cheese to a buttered baking dish, sprinkle with bread crumbs and then bake for 20 to 30 minutes, until golden brown on top and bubbling.


Recipe #6
Southwestern Taco Pot Pie

what you need
1 pound lean ground beef
1 (1.25-ounce) package Taco Seasoning Mix
1 tablespoon oil
1/3 cup water
1 (1-pound) package frozen green, red and yellow peppers and onions*
1 teaspoon garlic powder
1 teaspoon onion powder
1/4 teaspoon salt
1/8 teaspoon pepper
1 (11-ounce) can whole kernel corn, drained
1/2 cup salsa
1 (15-ounce) package refrigerated pie crusts, softened as directed on package
8 ounces (2 cups) shredded cheese recommended: Colby/Monterey blend or Mexican blend
Garnish:
Sour cream
Taco Sauce

make it 
Brown ground beef in large skillet over medium-high heat for 8 to 10 minutes or until thoroughly cooked, stirring frequently. Drain. Add taco seasoning mix and water; mix until ground beef is well coated.
Preheat the oven to 400 degrees F.

Meanwhile, heat oil in large saucepan over medium high heat until hot. Add peppers and onions; cook 4 to 5 minutes or until tender, stirring occasionally. Remove from heat and drain excess liquid. Add garlic and onion powders, salt, pepper, corn, and salsa, stir well and set aside.

Prepare pie crusts as directed on package for 2-crust pie using 9-inch glass or metal pie pan.

Combine salsa and corn mixture with ground beef; mix well. Sprinkle 1/2 cup of cheese evenly in bottom of crust-lined pan. Spread 1/2 of beef mixture evenly in pan over cheese, pat down. Sprinkle 3/4 cup cheese in pan and spread evenly with remaining beef mixture, pat down, top with remaining 3/4 cup cheese. Top with second crust and flute; slit in several places.

Bake for 30 minutes or until crust is golden brown. Cover edge of crust with strips of foil or a pie crust shield after 15 minutes of baking. Let stand 5 minutes before serving. Store in refrigerator.
Garnish with a dollop of sour cream and a drizzle of taco sauce. Also recommended: guacamole, salsa, and diced green chiles.

* If using fresh peppers and onions, use 1 1/2 cups chopped onions and 2 1/2 cups chopped peppers and increase prep time and stove top cooking time.


Recipe #7
Baked Barbecue Chicken, (served with Mashed Potatoes and Broccoli) 


what you need 
1 package drumsticks
2 cups ketchup
2 tablespoons Worcestershire sauce
2 tablespoons apple cider vinegar
1 cup brown sugar
salt and pepper to taste

make it 
Preheat the oven to 450. 

Place the drumsticks into a baking pan or on a rimmed baking sheet lined with foil or a baking mat.

Combine the rest of the ingredients. Pour 1 cup of the sauce over the chicken, reserving the rest. Bake the chicken until it’s opaque. About 40 minutes. Pour the rest of the sauce over the chicken and bake about 5 minutes longer. Serve!


Recipe #8
Italian Chicken 


what you need 
4 (4 ounce) boneless skinless chicken breast halves
1 cup Italian salad dressing
2 tablespoons grated Parmesan cheese
1/4 teaspoon salt
Chopped tomatoes and green onions, for garnish
1 cup Mozzarella cheese
1 lb pasta, cooked as directed

make it 
Combine Chicken and Italian dressing in a zip-loc bag. Refrigerate for an hour or more.

Cook pasta as directed on package.

Place chicken in a greased 9-in. square baking dish. Drizzle with salad dressing; sprinkle with Parmesan cheese and salt if desired. Bake, uncovered, at 375 degrees F for 20-25 minutes or until chicken juices run clear. 

To deliver, place noodles on the bottom of a foil baking dish. Top with chicken and Italian dressing juices. Sprinkle with chopped tomatoes, green onions and Mozzarella cheese.



Read more...

Fall Bucket List

>> Sunday, October 2, 2011

I just found this printable, and I thought I would share.  It's really cute and ironically most of the things on the list were on my "to-do" list anyway (though she does have a blank version if you have different activities on your agenda)!

There are tons of these online, but this one is the cutest one I've found!  I've printed one and will hang it on our door to the garage...adding a little color to the plain white door and reminding us of the fun to be had this fall.  Instead of checking off the squares, I'm going to write the date that we complete it and then save it for our memory box.


Visit her blog, Funky PolkaDot Giraffe to download and print this for yourself!

Read more...

Fall is here!

>> Thursday, September 8, 2011

So, Saturday was 99 degrees out and so humid, but ever since Labor Day we have barely hit 70 degrees!  Needless to say, the change in weather was much less subtle than normal!  I welcomed the cool weather this year...I love jeans and t-shirt weather :)  Fall is quickly becoming my favorite time of year.  Probably because I've been pregnant the last 3 out of 5 summers (2007, 2009 and 2011)!

Here are some things I found browsing Pinterest.com and thought I would share.  These things get me into the fall spirit!

http://ohsheglows.com/2011/08/16/mini-cinnamon-sugar-pumpkin-spiced-doughnuts-rosemary-olive-oil-chips/

http://www.thehighheeledhostess.com/2011/09/festive-fall-porch-ideas.html

http://www.craftinessisnotoptional.com/2010/10/paper-pumpkin-tutorial.html

http://familyofcrums.blogspot.com/2010/09/artsy-fartsy.html

http://abeautifulmess.typepad.com/my_weblog/2011/09/fall-leaves-garland-diy-project-.html

This is a cool photo idea...carve your chidren(s) ages into the pumpkin and have them hold it in their lap.
http://mymontessorimoments.com/2010/10/30/my-pumpkins/

Read more...

Lunch Box Notes

>> Sunday, August 28, 2011

While I don't have any kiddos going to school this year, I have been in a back-to-school mode for some reason.  Maybe it's because I have a lot of friends who are teachers or that most of my friends have a kid that is at least going to pre-school.


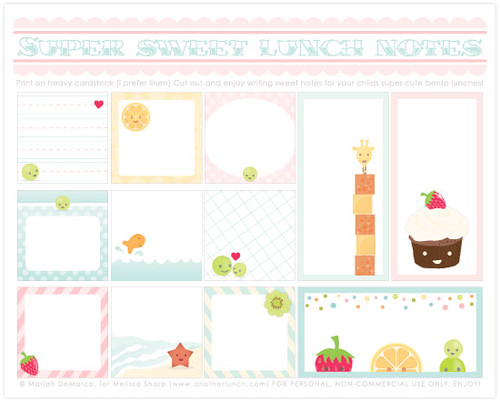
Anyway, one thing my mom did occasionally and something that I want to do for my kids when we get to this stage, is put notes in the lunch box.  Because she didn't do it every day, it was a nice surprise and such an encouragement to see!  I don't remember what Mom wrote the notes on, but I know it wasn't anything fancy.  But with the help of Pinterest.com (follow me on Pinterest here)and the internet, I found a ton of free printable lunch box note pages.  

Some of these are also suitable for sending in a lunch packed for your spouse as well :)

http://getbuttonedup.com/2010/08/25/tool-free-printable-lunchbox-notes/

http://kelsieandnate.blogspot.com/2011/08/friday-freebie-lunch-box-notes.html

http://silverboxcreative.com/blog/2010/08/lunch-box-notes/

http://freshpickedwhimsy.typepad.com/fresh_picked_whimsy/2009/02/love-notes.html

Ok, so this last one isn't a printable note, but you can also use a toothpick and "write" on a banana.  The note will show up about 1 hour later.  How cool!

Read more...