Search This Blog

Showing posts with label Home Improvement Projects. Show all posts

Space-Saving Coat Storage

>> Tuesday, October 30, 2012

My husband thinks I'm crazy sometimes, but I think I'm genius!  Ok, let me explain.  See, we had our home built about 6 years ago.  We basically went with a house at the top of our budget, at least the budget we wanted, not the bank.  That was when the housing market was booming, so they approved us for much more than we actually felt comfortable with.  Good thing we had some common sense (thanks, parents!), 'cause it probably wouldn't have been good.

Anyway, back to the genius part.  Our builder wasn't a custom builder.  As in, we had a few choices but not many.  We picked our flooring, countertops, cabinet style, and siding color from a limited selection.  Most things were upgrades that we would have had to pay extra for, so for the most part we stuck with the basics.  We didn't even have a choice in paint....everything was painted flat white.  My mom and I painted almost the entire house in the 2 days before we moved in.  Fun times!

One of the great things about our house is that it is a perfect DIY house!  Everything works and there is nothing we had to do, but there are lots of things we (or at least I) want to do.  One such project was to add storage near the main entrance.  Our front entrance and garage entrance are close to each other, and there is just a small 2x2 coat closet in between.  Not enough coat storage for a family of 5!  So, I started googling (this was before I knew about Pinterest.com!) and found a couple inspiration photos that I thought would be good for our situation.

Here's the project:

Basically, when you open the door from the garage, there is a blank wall that is just not doing anything.  Here it is in the photo below.  The door you see in the background on the right is our 1/2 bath, behind me is our front door, and to the left is the coat closet.


Anyway, I decided the best solution would be to add a coat rack behind the door.  My parents have a 103 year old farm house, and it has coat storage flat along the wall, so I kind of use that as my inspiration as well.  I would have loved to add a "locker" or a bench or something, but obviously there is no room for something like that.  So, off to the hardware store I went.  I basically just purchased some 1x6 boards.  I picked the pre-primed composite ones, because I'm pretty new with woodworking and didn't feel competent to work with raw wood.  If I had to do it over again, I would choose the raw pine wood because it's a little nicer material than the composite ones I chose.  The only extra step is to sand and prime the wood before you paint it, but that doesn't take very long to do.

So, basically once I purchased my wood, I came home and cut it to the length of my wall, painted it, put construction adhesive on it and then screwed it into the wall.  I wanted 5 hooks on each board, so I measured them out equally and put the screws in so they would line up behind the hooks.  No patching... genius!

Here's how it looked with the screws, before adding the hooks.


And here is the finished product:


It's the perfect place to hang the backpacks as well as some of the jackets that we use the most.  It also turned out to be a good place to stash a couple of baseball caps.

Here's a close-up of the hooks I used.  I found them at Lowes.  But unfortunately there was a supplier issue and I had to go to 3 different Lowes to get all 10 of my hooks :(.  But I really wanted hooks with two places to hang things on.  Plus I didn't want something that was tiny or huge since the door would hit them if they stuck out too far.  These were the perfect size.


So, those 10 hooks added a lot more storage room in a previously unused wall space.  For a little extra shoe storage, I hung a closet organizer on the back of our closet door...it's the perfect size for all of those toddler and little boy shoes. Plus our adult sandals fit in there as well.


Hope this post gives you a little inspiration for a totally easy DIY project!

Read more...

The Evolution of a Swing Set

>> Tuesday, April 10, 2012

Today we built a new swing set for the kids!  My parents and Steve's dad came this morning to help assemble the new swing set.  I bought a kit on Amazon that included instructions, brackets, swings and a canopy and then I purchased the wood and screws separately as well as a glider swing.  I took photos of the entire process and wanted to share :)

Mom and Molly sitting on one of the piles of wood.


I had two little boys who "helped"the entire day.  The past week they have been telling everyone that someone "sole our old swing set so we are building a new one."  I actually sold the old one on craigslist, but whatever :)


 Starting to put the "fort" area together.


Getting there, but so much more to do!


For those of you who know my dad, you won't believe this photo...WHAT!?  He's actually reading the INSTRUCTIONS?  Maybe he was just posing for the picture :)


The boys helped me screw on the deck boards and then we paused for a photo op.


Putting the swing hangers on the beam.  Oh, and the kids decided they didn't want to wait any longer.  Who cares that the ladder to get up isn't built yet...just climb up the slide!


SWINGS!!  I still need to buy one more set of swing hangers for Molly's swing, which will go between the boys' swings.


Almost there!  Just need to finish adding the safety boards around the "fort".


Finished for now...just need to hang the glider on the cantilever area (I forgot to buy the hangers for it), add Molly's swing, stain and add the sand.  Oh, and you can't really tell from this photo, but the yard kinda goes downhill towards the fence, so I need to dig some holes for the A frame brace to go into to make it level...right now it goes uphill.


Oh, and just to compare, here is a picture of the previous swing set.  It was similar except it was about 20 years old, wobbly, leaning and it only held 3 swings.  It's hard to tell with the different angle but the new one is much bigger, sturdier and will hold 3 swings plus the glider.


It was a great team effort and I'm so excited to have this project almost finished :)

Read more...

Painted Entertainment Center

>> Friday, January 27, 2012

I'm embarrassed to show you these pictures of my mess, but I will anyway.  I think I've said before, but we moved into a 2 bedroom apartment in July until the house we are building is finished (hopefully April).  We've done pretty well, considering the huge decrease in square footage.  But finding space for all of our stuff is a big challenge, even though most of it is in storage or in our garage.  We left most of our furniture in the house we are trying to sell now.  We had this old entertainment center in our basement and it housed a tv I watched while on the treadmill.  We decided since it was small and pretty light, we would just use it until we moved into the new house.  It was super ugly, and the glass on the door had broken a few years ago.


First I took off all the doors, shelves, etc.  Then I painted with 2 layers of a Martha Stewart paint.  (I was trying to do it pretty fast and I don't intend to keep it very long; otherwise I would have used a primer first).  Let the paint dry completely between coats.  Next I brushed the entire thing with a metallic glaze (also a Martha Stewart product from Home Depot) and then wiped the glaze off with a damp cloth until  I liked the amount of glaze left.  Then I sanded all the edges and wiped them with a minwax stain to give more of a distressed, antique finish.  I filled in the holes with wood putty and added some knobs.  I also stapled some chicken wire inside of the door.  My husband cut a board for the back for me also.

Overall, I thought it was a major improvement and it looks pretty cute in person.  If you have interest in repainting a piece of furniture, there are some great resources available.  Searching pinterest for "repainting furniture" or "refinishing furniture" should get you started.


Read more...

Ch-Ch-Changes!

>> Thursday, January 26, 2012

Have I told you how much I LOVE craigslist?  If you've never visited the site, you're missing out!  It's a virtual garage sale where you can buy and sell junk stuff.  It's part of the reason we were able to become debt-free last year.


So, I got it in my head that we needed a new table for our kitchen.  It's kind of an eat-in kitchen and it's not a huge place, but our dining room has CARPET, so the daily place for us to eat our meals is at the kitchen table. We do have some bar stools at our counter now that I have made the top bigger and there is an overhang.  The boys love to eat breakfast there, but they also like to stand on the stools and that resulted in a trip to the ER a few weeks ago (mild concussion and he is fine, but it scared him and momma!).

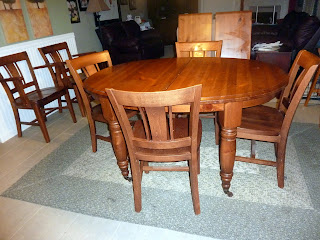
Anyway, our table was oval.  I got that on purpose because I thought the boys would have less corners to run into and less trips to the ER or bruises on their foreheads.  Which is probably true.  Except there were a few problems.  (Please excuse the low-quality photo taken late at night and taken for craigslist so it shows the leaves and the extra chairs in the background)


See how the legs of the table aren't very wide apart.  So, unless you add a leaf or straddle the legs, you could only fit 4 people at the table.  There were two leaves, but when I added those, the table was really long and made it really difficult to get around.  I have taken the photo standing in the kitchen, and the living room is in the background, so it's essential to be able to walk around the table.  The other problem?  See the bottom of the legs?  Those are WHEELS.  Which makes it really easy to add the leaves in, but also makes it really easy for two boys to sit at the dinner table and try to crush the other person with the table.  There's also a nice beveled edge.  Which is a dried food magnet.  Oh, and the crack for the leaves?  Yeah, right where the boys sit.  Which means pulling apart the table after every meal to clean out the crack.  Otherwise it's YUCK CITY!  

Which lead me to looking on Craigslist for an alternative set.  You see, I do have 4 year old and 2 year old BOYS, so I wasn't looking to spend a lot of money because it's pretty much going to get trashed over the next 5-10 years.  I stumbled across a nice set with a BUTTERFLY leaf (yeah, no more "where do I store this stupid leaf?) and it extends to a square to make 2 people sit on each side.  Which also means the crack is where Steve and I sit and not the boys.  Also, the legs are in the corner of the table so we can fit 6 chairs at the table without any problems.  Here's to hoping the boys don't have any problems with the corners!


And the best part?  The table I had before was Pottery Barn (that I had purchased off craigslist about a year ago!) and I was able to sell it for more than the one I purchased.  Oh, and while I was at it, I got a nice rug.  Off Craigslist, of course :)

Read more...

Stainless Steel Countertops

>> Friday, October 7, 2011

As most of you know, I am a stay-at-home mom.  But I also make cakes (wedding, birthday, etc) from my home.  This helps me keep my sanity and earn a little extra spending money to fund my HGTV and DIY Network addiction. :)

Anyway, one thing I have really been wanting for our kitchen is a larger center island.  Our kitchen is great and we have lots of counter tops, but our center island counter top is fitted to the cabinets and doesn't allow for bar stools.  Something that I've wanted since the first party we had at our house. 

Here is a photo of the unfinished kitchen right before we moved in 6 years ago.  Please forgive the quality of the photos...our digital camera was much lower quality back then!


Here is a photo of the kitchen after we painted and move the appliances in, but we were still moving all of our junk in, so therefore all the junk laying around.


Our home was built by Beazer Homes.  They are not a custom builder, so we didn't get many options on finishes, but we did get to pick our counter tops from about 10 different laminate styles.  This is a close-up of ours.


It's great because it doesn't show stains.  My parents have white counter tops courtesy of the previous owners of their house and I don't know how they have lived with them for so long!  While I like the color of our counter tops, laminate really isn't the "in" thing anymore.  Obviously.

So, besides wanting some bar stools, I've been wanting a surface that is better for working with my cakes. I do cakes with fondant icing a lot, but I always have to spread out some vinyl mats to work with it on because fondant sticks to laminate.  And the last thing you want once you've rolled out a huge sheet of fondant is for it to stick to the counter and leave a hole right in the middle because a patch almost always shows, so I would have to re-do it a lot.

In my research of finding out the best surfaces for fondant use, I found that solid surface counter tops and stainless steel are both NSF certified (food safety standards).  I am a home-based "cottage bakery", so I don't have to meet the NSF standards, but I like to do everything as sanitary as possible.

I really liked the look of stainless steel to add a little modern look to our kitchen.  So I did some further research and found some companies online to get quotes from and also went to Home Depot and Lowes for some quotes as well.  Um, can you say EXPENSIVE?!  I needed a 3'x6' piece for our island, and most companies were coming in around $2500.  I think the lowest quote I received was $1700.  Which was even more expensive than the high-end granite at the big box stores.  Yikes!

So, I did some more research.  AKA, I called my dad.  My dad is an airplane mechanic and I know he works with metal and welding and such, so I thought he might have some ideas.  Unfortunately, he said he didn't have the tools or access to the tools needed to work with stainless steel.  But he recommended calling a local metal shop to see if they could custom fabricate anything for me.  SCORE!  I called a local company and they quoted me $310.  WHAT!?  You've got to be kidding!  They used fancy terms like "sheared edges" and "20 gauge" in the conversation, so I called up my dad just to see if that is what I needed and he agreed, so I ordered it!

The company did end up taking a little longer to make it than they originally promised, but I really wasn't in any hurry and it wasn't that big of a deal.  I actually probably got it sooner than if I would have ordered it from any of the other companies.  I actually ordered it on 9/13 and got the call that it was ready for pickup on 10/5.  So, three weeks.  The most nervous part of the process was just waiting to see it.  Since it was custom, it wasn't like I could go and pick it out.

Anyway, here's a long-awaited photo of the new island counter top!


See how it shines?  I love it!  It's got a brushed finish so it should mask any scratches pretty well.  I was really nervous about how sharp the corners and the bottom edge would be, but I really don't think it will be a problem.  At some point, one of the kids is bound to run into one of the corners and get hurt, but they would do that with any surface.  They are soldered, so they aren't sharp but they definitely stick out farther than the old counter top.


So, here's a photo of the entire kitchen.  As you can tell from the first photos, not a lot has changed since we moved in.  We still have the same colored walls (I love the color!).  Just about the only difference is the light fixtures.  We changed out the mushroom light over the sink and added a couple matching pendant lights over the island.  I still need to find 3 bar stools and am even thinking about changing the back/sides of the island to a bead board and add some trim molding around the base to give it a more "built-in" feel.  Oh, and eventually we will change out the rest of the laminate to a solid surface.  And I would live to have a marble tile back splash (subway style) and add crown molding to the tops of the cabinets as well. See, I told you I watch way too much HGTV and DIY network!


Read more...