Search This Blog

Showing posts with label freezer friendly. Show all posts

No, really...I am back :)

>> Monday, October 29, 2012

So, I wrote a blog post with the reasons why I haven't posted much over the past 9 months. And then I promised that I would write more.  And it's been an entire month since that post and I haven't written anything.  Ugh.  I'm such a good blogger :)

I do have several posts to write on projects that I've been working on...but for now, I'll share a recipe that I tried for breakfast this morning.  It was really good, but totally not healthy by any stretch of the imagination.  But it's great for a special occasion.  And today's special occasion was that it's Monday and my youngest had her 15-month check-up (3 shots!) today. Which, in my book, requires something special for breakfast.


If you are looking for a quick, no rise cinnamon roll that tastes good, try this recipe:

No Yeast Cinnamon Rolls (click for the original recipe & wonderful photos!)


Preheat your oven to 425. Pour 1 tablespoon of melted butter into a 9-inch round cake pan. Brush to coat the entire perimeter of the pan.
Filling:
In a small bowl, combine:
  • 3/4 cup dark brown sugar
  • 1/4 granulated sugar
  • 2 teaspoons cinnamon
  • 1/8 teaspoon ground cloves
  • 1/8 teaspoon salt
Add 1 tablespoon of melted butter and stir until crumbly. Set aside.
Dough:
In a medium bowl, combine:
  • 2 1/2 cups all-purpose flour
  • 2 tablespoons sugar
  • 1 1/4 teaspoons baking powder
  • 1 1/4 teaspoons baking soda
  • 1/2 teaspoon salt


In a separate bowl, combine:
  • 1 1/4 cups buttermilk
  • 2 tablespoons butter, melted
Add the buttermilk mixture to the flour mixture and stir until the liquid is just incorporated, about 30 seconds. Transfer the dough to a lightly floured work surface and knead until just smooth, 3 to 4 minutes. Roll the dough into a 9x12-inch rectangle. Brush the surface of the dough with 1 tablespoon of melted butter.
Sprinkle the filling evenly over the dough. Gently press the filling into the dough. Starting at a long edge, roll the dough to form a log.
Cut the log into eight equal pieces. Place one roll in the center of the prepared pan, and the seven remaining rolls around it in a circle. 
Brush with 2 tablespoons of melted butter. 
Bake in the preheated oven for 25 to 28 minutes, or until golden brown. Allow rolls to cool for 5 minutes.
Glaze:
In a small bowl, combine:
  • 3 oz. cream cheese, softened
  • 2 tablespoons buttermilk, at room temperature
  • 4 tablespoons confectioners' sugar
Whisk first 2 ingredients until smooth. Add 4 tablespoons of confectioners' sugar 1 tablespoon at a time. Whisk until a smooth glaze forms, about 30 seconds.


Enjoy!

Read more...

White Chicken Enchiladas

>> Friday, January 20, 2012


So, this was another recipe I found on Pinterest a while ago (if you are still holding out and haven't checked the site out yet, you really should!  I can send you an invite if you need one!!).  I thought it looked yummy, so I pinned it to make it at a later date.  That later date was this past Tuesday evening.  YUM!


So the recipe was really easy, take 10 tortillas, fill them with a chicken and cheese mixture, roll them up and put them in the baking dish, spoon a sauce over top, spread cheese and then bake.  Except, I didn't have 10 tortillas....I only had 3.  Definitely not enough to feed our family of 4 (Molly doesn't eat this type of stuff yet).  I had about an hour to get dinner done and didn't want to take all three kids out to the grocery store.  So, I had remembered seeing another pin about how to make tortillas, so I looked for that and found it.  It was surprisingly easy and tasted really good!  I'm not sure if you could make a couple batches ahead of time and then put them in the fridge or if you would need to make them fresh for when you wanted to use them.  I'll have to experiment with that and let you know what I find out.  

Also, instead of using shredded chicken, I used some "Fresh Ham Steaks" that were in our freezer from our hog purchase last year.  These are basically pork chops, but ours are bigger than a regular pork chop.  I pan cooked them with a little salt and pepper and then cut it up and measured out 2 cups to use.   Anyway, here are the recipes...enjoy!

Ingredients
·         2  3/4 cups all-purpose flour, plus a little extra for rolling the tortillas
·         1/3 cup vegetable shortening
·         3/4 teaspoon salt
·         3/4 cup very warm tap water
Directions
1.           Combine the flour and shortening in a large mixing bowl.  Using a pastry blender or a fork, work the shortening into the flour  until it's mixed well and you can't see the shortening anymore.  
2.          Dissolve the salt in the warm water. Pour about 2/3 cup over the dry ingredients and immediately work it in with a fork.  Scoop the dough onto your work surface and knead until smooth.  It should be a medium-stiff consistency – not firm, but not quite as soft as most bread dough either.
3.          Divide the dough into 12 portions and roll each into a ball.  Set them on a plate, cover with plastic wrap and let rest for at 20-30 minutes – this makes the dough easier to roll.
4.          Heat an ungreased griddle or heavy skillet over medium to medium-high heat.
5.          Flatten a ball of dough, flour it, then roll forward and back across it; rotate a sixth of a turn and roll forward and back again; continue rotating and rolling until you reach a 7-inch circle, lightly flouring the tortilla and work surface from time to time.
6.          Lay the tortilla on the hot griddle (you should hear a faint sizzle and see an almost immediate bubbling across the surface).  After 30 to 45 seconds, when there are browned splotches underneath, flip it over.  Bake 30 to 45 seconds more, until the other side is browned; don’t overbake the tortilla or it will become crisp.  Remove and wrap in a cloth napkin placed in a tortilla warmer.  Roll and griddle-bake the remaining tortillas in the same manner – stack them one on top of the other in the warmer.

Ingredients
·         10 soft taco shells
·         2 cups cooked, shredded chicken (I used fresh ham steaks, or pork chops)
·         2 cups shredded Monterey Jack cheese
·         3 Tbsp. butter
·         3 Tbsp. flour
·         2 cups chicken broth
·         1 cup sour cream (I used plain yogurt)
·         1 (4 oz) can diced green chillies
Directions
1.         Preheat oven to 350 degrees.  Grease a 9x13 pan.
2.        In a sauce pan, melt butter, stir in flour and cook 1 minute.  Add broth and whisk until smooth.  Heat over medium heat until thick and bubbly.
3.        Stir in sour cream and chilies.  Do not bring to boil, you don't want curdled sour cream.
4.        Mix chicken (or pork) and 1 cup cheese and about ½ cup of the sauce.  Roll up in tortillas and place in pan. 
5.        Pour sauce over enchiladas and top with remaining cheese.
6.        Bake 22 min and then under high broil for 3 min to brown the cheese.

Read more...

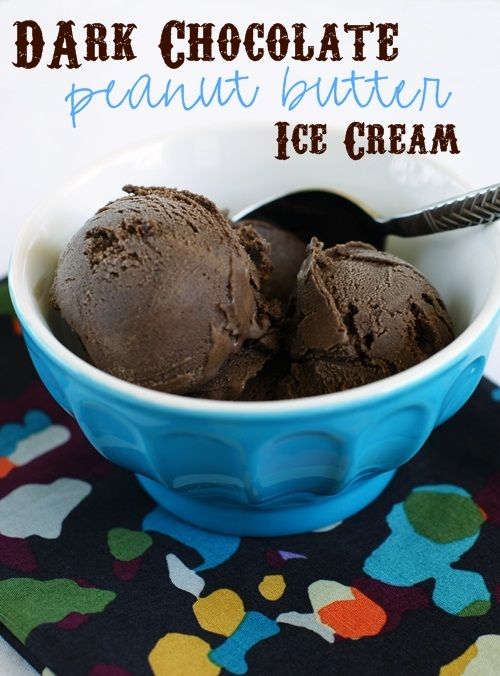
Dark Chocolate Peanut Butter Ice Cream

>> Monday, August 8, 2011

As soon as I saw this recipe on the Bake at 350 blog, I knew I had to make it!  Unlike Lesley, I tend to lean towards making the recipes that are totally not healthy.  Which could be why she is skinny and I am not. ;)

Anyway, my sisters bought me a Cuisinart ice cream maker for my birthday last year.  It came with a recipe book and I've tried several of the recipes, but this Dark Chocolate Peanut Butter ice cream has been the best recipe yet!  She adapted it from Ben & Jerry's recipe book, so no wonder it's good.


I followed the recipe just making one minor change.  Instead of adding the peanut butter just before putting it in the ice cream maker, I added it while the ingredients were warm.  I found that it really mixed into the chocolate easily and I don't think it affected the flavor. Here's the recipe the way I did it:

Dark Chocolate Peanut Butter Ice Cream 

2 oz. unsweetened chocolate ( I used Baker's brand)
1/3 cup dutch-process cocoa powder (such as Hershey's Special Dark)
1 & 1/2 cups milk
2 eggs
1 cup sugar
1 cup heavy cream
1 tsp vanilla
1/2 cup smooth peanut butter (I used Skippy's Roasted Honey Nut)

Place a heatproof bowl over a pot of simmering (not boiling) water.  Melt the unsweetened chocolate. Gradually add the cocoa; the mixture will clump up in the whisk.  Slowly pour in the milk, whisking with the chocolate mixture until combined and smooth.  Remove from heat and let cool several minutes.

Whisk the eggs in a large bowl until light and fluffy, 1-2 minutes.  Add the sugar, a little at a time, whisking constantly.  Once all the sugar has been added, whisk 1 minute more.

Add the cream and vanilla; whisk to combine.
Add the peanut butter to the chocolate mixture and stir until smooth.  

Pour the chocolate mixture into the cream mixture and stir.  Cover and refrigerate a few hours or overnight.  After chilling, process in an ice cream maker.  Once the freezing cycle finishes, transfer to a freezer-safe container and freeze a few hours to firm up.

Yum!

Read more...

Chicken Taquitos

>> Monday, June 13, 2011

This is a super easy, fast recipe. It is great for freezing too. My husband actually likes this one, so it must be good. I could eat Mexican food every day of the week, so I really wear him out on it. If I weren't pale to the point of translucency I would swear I had Mexican ancestry! But he loves this one.


3 oz cream cheese, softened (i use reduced fat)

1/4 cup salsa (the fresh kind is best)

1 Tbsp lime juice

1 tsp chili powder

1/2 tsp cumin

2 cloves garlic, minced

3 Tbsp chopped cilantro

1-2 green onions, chopped

2 cups shredded cooked chicken

1 cup shredded cheese (mexican, cheddar, pepper jack, whatever you have)

10-12 6-inch flour tortillas


Preheat oven to 425. Line baking sheet with foil and grease it. Combine all the filling ingredients in a bowl and mix until well combined. Put 2-3 tablespoons of filling down the middle of a tortilla and roll up tightly. Place seam side down on the baking sheet. Spray the tops of tortillas lightly with cooking spray. Bake 15-20 mins.


To freeze, assemble as above and put on baking sheet. Freeze on the baking sheet and them transfer to a ziploc bag. Add a few minutes to baking time for frozen taquitos.

Read more...